|
|
|
Who's Online
There currently are 6043 guests online. |
|
Categories
|
|
Information
|
|
Featured Product
|
|
|
 |
|
|
There are currently no product reviews.
 ;
Great price, Quick delivery, the document was very usefull A+++++++++++++++
;
Thank´s for your help, I already recived these manual from you
;
Thank you for your manual It has the basic things to and i use the Oszi for Longer Time.
THX
;
Actually, I was looking for this information for 3 years!...now thanks to you, the manual is on my hands and of great help, cause I understand now where I was doing wrong connections and wires...excellent, I'll be back to you if in need, thank you.
 ;
This manual covers the main equipment features only. While it also includes the procedure for saving and loading from the now long obsolete memory cards it does not mention the how to operate with the optional floppy drive interface so I am still at a loss about how to use this! Note that there is a separate manual covering the MIDI interface and programming via the keyboard, not included in this download. You will also need to get hold of this if you want to use the MIDI interface properly. Basically there is little difference between this manual and the free to download manual for the similar PR60 model.
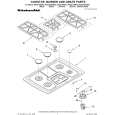
COPIADO NORMAL
G
Para ajustar manualmente la densidad de la copia, pulse la tecla AUTOMATICA/MANUAL/FOTOGRAFIA ( / / ), seleccione MANUAL ( ) y ajuste la densidad deseada con las teclas de claro ( ) y oscuro ( ).
G
G
Para fotografÃas, seleccione FOTOGRAFIA ( ) y ajuste la densidad deseada con las teclas de claro ( ) y oscuro ( ). Hay 5 niveles de exposición indicados con los 3 indicadores. (Los indicadores se van encendiendo uno o dos cada vez.) Cuando se selecciona el nivel de exposición 2, se encienden simultáneamente los dos indicadores del extremo izquierda. Por otro lado, si se selecciona el nivel 4, se encienden simultáneamente los dos indicadores del extremo derecha.
6
Ponga el número de copias con el teclado numérico.
G G
Se hace una sola copia con el ajuste inicial, es decir, cuando la visualización está en �0�. Pulse la tecla de ANULACION ( ) para un ajuste mal programado.
7
Pulse la tecla de COPIADO (
G G G G
El número en el indicador de la cantidad de copias disminuirá uno en uno cada vez que se haga una copia. Para detener el copiado en la mitad de un ciclo, pulse la tecla de ANULACION ( ). Para repetir la misma secuencia de copiado con otro original, simplemente reemplace el original y pulse la tecla de COPIADO ( ). Si se queda sin papel en el casete seleccionado durante un trabajo de copiado y no hay ningún otro casete que contenga papel del mismo tamaño, puede seleccionar la alimentación manual utilizando la tecla de selección de bandeja ( ).
).
PARA HACER COPIAS Copiado normal
Desmontaje de la tapa de los originales
La tapa de los originales puede desmontarse para copiar objetos gruesos. Para desmontar, levante simplemente la tapa de los originales hacia arriba.
G
Instale la tapa de los originales en orden inverso.
15
 $4.99 AR-162 SHARP
Parts Catalog Parts Catalog only. It's available in PDF format. Useful, if Your equipment is broken and You need t… 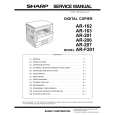 $4.99 AR162 SHARP
Service Manual Complete service manual in digital format (PDF File). Service manuals usually contains circuit diagr…
|
|
|
> |
|