|
|
|
Who's Online
There currently are 6043 guests online. |
|
Categories
|
|
Information
|
|
Featured Product
|
|
|
 |
|
|
There are currently no product reviews.
 ;
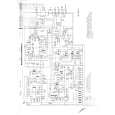
This manual is for the usa model only. But it is clear
, accurate and comprehensive, including board layouts and schematics.
I found it extremely useful for my mitsubishi dp-86da, but the same diagram would also work for the realistic lab5000 and hi fi 80. Thanks.
;
Great to have extra resources for Service Manuals, Now days you can really not trouble shoot efficiently without one , Wayne at IRIONS TV & ELECTRONICS REPAIR Clearwater , Fl. 33755 727-446-7955
 ;
For five bucks you can barely buy a hamburger. Or for the same five bucks you can buy a service manual. Much more useful. (and better for your health, depending on where you buy your hamburgers).
Yes, there are free manual sites out there, but if they don't have what you want, you have to pay.
And five bucks isn't much. Not for full specs, schematics and adjustment and parts replacement procedures.
My only criticism is that grayscale illustrations aren't well rendered, but I've seen worse.
Schematics and text are clear.
I'll be happy to purchase from here again.
Mike
[email protected]
;
Impressively thorough. Even the simple operators manual helped me "fix" one of the 2 CD players in the unit. This unit reads CD's from the top so they should be installed in the magazines "upside down" from typical CD players. The CD player service manual helped me unjam a stuck carriage because somebody transported the box laying down loaded with CD's. A little lens cleaning & the player now works well! Thanks for you help at a great price! Joe
;
I was skeptical at first but later found the manual to be good quality for the price. It took a couple hours to receive the email with the download link, well worth the wait. Thanks.
SETTING CLOCK RESETTING THE MICROCOMPUTER
EQUALIZER q To erase all of the stored memory contents (clock and timer (Main unit operation) tem. X-BASS/ settings, tuner and CD presets). DEMO q If the display is not correct.
Reset microcomputer under the following conditions: In this example, clock is set for the 12-hour (AM 12:00) sys-
q If the operation is not correct.
MEMORY/SET
POWER Within 5 seconds, press the MEMORY/SET button. ON/
1
Press ON/STAND-BY button to enter the stand-by mode.
2 Press the CLOCK button. 1 Press ON/STAND-BY button to enter the stand-by mode. 3 2
ON/ BASS/DEMO button, hold down the ON/STAND-BY button for STAND-BY at least 1 second. Press TUNING/TIME ( or ) button to select the time
POWER STAND-BY While pressing down button and the EQUALIZER/X-
4
(AM 12:00 PM 11:59) Caution: TIME (AM 0:00 PM 11:59) memory including clock timer settings, tuner and CD
presets. "0:00" � The 24-hour display will appear.
display mode. q "CLEAR AL" will appear.
CLOCK "AM 12:00" � The 12-hour display will appear. TUNING/
"AM 0:00" � 12-hour display appear. q The operation explained above will erase all data stored in ( ) (0:00 23:59)
q Note that this can only be set when the unit is first installed
or it has been reset (see page 15).
2
5 Press the MEMORY/SET button. 6 Press TUNING/TIME ( or ) button to adjust the hour.
q Press the TUNING/TIME ( or ) button once to advance
the time by 1 hour. Hold it down to advance continuously.
q When the 12-hour display is selected, "AM" will change auto-
matically to "PM".
3
4 minutes.
7 Press the MEMORY/SET button. 8 Press TUNING/TIME ( o r ) button to adjust the
OPERATION MANUAL
�5�
q Press the TUNING/TIME ( or ) button once to advance
q The hour setting will not even if minutes advance from
by 1 minute. Hold it down to change the time in 5 minute intervals. 12:00 AM 0:00
"59" to "00".
q The clock starts operating from "0" second.
9 Press the MEMORY/SET button. 5
(Seconds are not displayed.) And then the clock display will disappear after a few seconds.
To see the time display:
Press the CLOCK button.
q The time display will appear for about 5 seconds.
6
Note: q The clock display will flash on and off at push of the CLOCK button when the AC supply is restored after a power
failure occurs or after the AC power cord is disconnected.
7
If this happens, follow procedure below to change the clock time.
To change the clock time:
8 xPress the CLOCK button. yWithin 5 seconds, press the MEMORY/SET button.
9 zPerform steps 6 9 above.
To change the time display mode:
xPerform steps 1 2 in the section "RESETTING THE
MICROCOMPUTER", on page 15.
CD-BA120/125
yPerform steps 1 9 above.
|
|
|
> |
|