|
|
|
Who's Online
There currently are 5906 guests online. |
|
Categories
|
|
Information
|
|
Featured Product
|
|
|
 |
|
|
There are currently no product reviews.
 ;
I want to give you a real heads-up for your desire to enable such people as I to acquire the information I need to maintain the older types of equipment such as this Akai HXA351W. You do a swell job with all the processes you have to perform so I can have a legible, thus usable
document which does not send me crazy trying to figure out the blurry text of a bad copy.
Very well done, Thomas.
;
This manual is very well presented and after printing out looks about as close to an original as I think you can get. The quality is second to none.
The content of the manual is comprehensive and I think it would be well suited to an audio repair professional which I'm not but I did find it very informative and helpful.
The cost of the manual is more than covered by the money I'll save when I change the keep memory battery now I have the relavant info.
Very pleased with my purchase and can recommend it wholeheartedly as I can other manuals I've downloaded from this site.
Regards
Limey Alex
 ;
Complete manual including mechanical part in good pdf quality. Shaded greys of the pcb due to pdf not perfect but usable.
;
Nice pdf file of the manual sent promptly. Thanks.
;
Complete MFG Service Manual at a good price FAST !
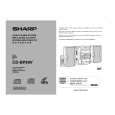
CD-BK110V/CD-BP99V
Setting the Clock (For CD-BK110V)
4
Press the TUNING/TIME ( or ) button to adjust the hour and then press the MEMORY/SET button.
Press the TUNING/TIME ( or ) button once to advance the time by 1 hour. Hold it down to advance continuously. When the 12-hour display is selected, "AM" will change automatically to "PM".
5
In this example, the clock is set for the 24-hour (0:00) display.
Press the TUNING/TIME ( or ) button to adjust the minutes and then press the MEMORY/SET button.
1 2
Press the ON/STAND-BY button to turn the power on. Press the CLOCK button and within 5 seconds, press the MEMORY/ SET button.
Press the TUNING/TIME ( or ) button once to advance the time by 1 minute. Hold it down to change the time in 5-minute intervals. The hour will not advance even if minutes advance from "59" to "00". The clock begins counting from "0" seconds. (Seconds are not displayed.) The time display will disappear after a few seconds.
To confirm the time display:
3
Press the TUNING/TIME ( or ) button to select 24-hour or 12-hour display and then press the MEMORY/SET button.
Press the CLOCK button. The time display will appear for about 5 seconds.
Note:
The "CLOCK" or time will flash at the push of the CLOCK button when the AC power supply is restored after a power failure or unplugging the unit. Readjust the clock as follows. "0:00" "AM 12:00" "AM 0:00" The 24-hour display will appear. (0:00 - 23:59) The 12-hour display will appear. (AM 12:00 - PM 11:59) The 12-hour display will appear. (AM 0:00 - PM 11:59)
To readjust the clock:
Perform "Setting the Clock" from the beginning. If the time display is flashing, step 3 (for selecting the 24-hour or 12-hour display) will be skipped.
To change the 24-hour or 12-hour display:
1 2 Clear all the programmed contents. [Refer to "Clearing all the memory (reset)".] Perform "Setting the Clock" from the beginning.
Note that this can only be set when the unit is first installed or it has been reset. [Refer to "Clearing all the memory (reset)".]
Setting the Clock (For CD-BP99V)
4
Press the TUNING/TIME ( or ) button to adjust the hour and then press the MEMORY/SET button.
Press the TUNING/TIME ( or ) button once to advance the time by 1 hour. Hold it down to advance continuously. When the 12-hour display is selected, "AM" will change automatically to "PM".
5
In this example, the clock is set for the 24-hour (0:00) display.
Press the TUNING/TIME ( or ) button to adjust the minutes and then press the MEMORY/SET button.
1 2
Press the ON/STAND-BY button to turn the power on. Press the CLOCK button and within 5 seconds, press the MEMORY/ SET button.
Press the TUNING/TIME ( or ) button once to advance the time by 1 minute. Hold it down to change the time in 5-minute intervals. The hour will not advance even if minutes advance from "59" to "00". The clock begins counting from "0" seconds. (Seconds are not displayed.) The time display will disappear after a few seconds.
To confirm the time display:
3
Press the TUNING/TIME ( or ) button to select 24-hour or 12-hour display and then press the MEMORY/SET button.
Press the CLOCK button. The time display will appear for about 5 seconds.
Note:
The "CLOCK" or time will flash at the push of the CLOCK button when the AC power supply is restored after a power failure or unplugging the unit. Readjust the clock as follows. "0:00" "AM 12:00" "AM 0:00" The 24-hour display will appear. (0:00 - 23:59) The 12-hour display will appear. (AM 12:00 - PM 11:59) The 12-hour display will appear. (AM 0:00 - PM 11:59) Note that this can only be set when the unit is first installed or it has been reset. [Refer to "Clearing all the memory (reset)".]
To readjust the clock:
Perform "Setting the Clock" from the beginning. If the time display is flashing, step 3 (for selecting the 24-hour or 12-hour display) will be skipped.
To change the 24-hour or 12-hour display:
1 2 Clear all the programmed contents. [Refer to "Clearing all the memory (reset)".] Perform "Setting the Clock" from the beginning.
�8�
|
|
|
> |
|