|
|
|
Who's Online
There currently are 5547 guests online. |
|
Categories
|
|
Information
|
|
Featured Product
|
|
|
 |
|
|
There are currently no product reviews.
 ;
The manual was complete and extremely helpful in both diagnosing the problem I was having as well as fixing it. Excellent quality. I will getting additional manuals in the future.
;
Exactly the JVC service manual and schematics that I was looking for - delivered just hours after order. Will do business again!
;
This is a fantastic site, ad I have been a returning satisfied cusumer!
Thanx for a great sevice!
;
Je suis audiophile belge, électronicien et créateur d'enceintes acoustiques.
J'ai apprécié la qualité des documents fournis. Ils sont très lisibles, ils peuvent être agrandis sans problème et ils sont complets. Pour moi, c'est parfait. Pour cette qualité, je suis d'accord de payer. Et le système de paiement et d'envoi est simple. Merci, continuez comme cela.
Frédéric
;
The cover page was a little scary, very dark but readable. The remainder of the document was better copy and easily readable. Why would I give 5 Stars? (1) PRICE, (2) AUTHENTICITY, It was the real deal, filled with service information, including the specific information I required. (3) PRIVACY, I didn't start to get slammed with spam. (4) EASY TRANSACTION. Painless. (5) COMPLETE, I have found several manuals here, that I could find nowhere else. (6) I will be a repeat customer!
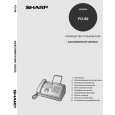
UX-68ES/F/GG/IT FO-90IT 4. Loading the fax paper (FO-20PR6)
� � Your fax machine prints incoming faxes on a special kind of paper called fax paper. The fax machine�s print head creates text and images by applying heat to the fax paper.
5 Insert the leading edge of the paperuntil the slot asout the opening in into shown. Continue to push the paper through the slot it comes
the front of the machine.
1Grasp the finger hold as shown and pull up to open the operation
panel.
6 Make sure the paper comes out straight, and then flip down the paper guide.
2Flip up the front paper guide.
UX-68
UX-68
FO-90
FO-90
3If you are loading paper that is 210mm in width, place the paper roll shims
� The ribbed side of the shims should face in (toward each other).
Press the knob to make sure the front side of the metal guide is down.
on each side of the paper compartment. (Note that Sharp recommended paper, including the initial roll, is 216mm in width.)
7 Close the operation panel, making sure it clicks into place. 4 Unwrap the roll of thermal paper and place it in the compartment.
YES NO!
� A short length of the paper will be cut off. (FO-90) � A short length of the paper will feed out. Grasp the paper by the edge and pull upward to tear it off. (UX-68)
� Important: The roll must be placed so the leading edge of the paper unrolls as shown. (The paper is only coated on one side for printing. If the roll is placed incorrectly, the paper will come out blank after printing.)
Click!
1�6
 $4.99 FO90 SHARP
Owner's Manual Complete owner's manual in digital format. The manual will be available for download as PDF file aft…
|
|
|
> |
|