|
|
|
Who's Online
There currently are 6023 guests online. |
|
Categories
|
|
Information
|
|
Featured Product
|
|
|
 |
|
|
There are currently no product reviews.
 ;
very helpful, the information in these manuels are very detailed
;
Please tell us what you think and share your opinions with others. Be sure to focus your comments on the product. You will receive $2.00 of store credit for Your review.
;
Please tell us what you think and share your opinions with others. Be sure to focus your comments on the product. You will receive $2.00 of store credit for Your review.
;
Good copy and great customer service! There was some confusion with my order and it was resolved promptly!
;
Having bought a pre-owned Sony FM stereo tuner through eBay, it came without any manuals. It soon became clear that to get the best from this excellent tuner I needed a decent manual because much of the operation was not intuitive to a newboy to hi fi like me. I managed to download the official Sony multi-lingual manual from Owner-Manuals.com with no problem at all - a really quick and easy service. I'm very glad I did because I found out all the operations of the tuner and was then able to not only set it up quickly but also to get much more from it that poke-and-hope trialling would ever achieve. In my book $4.99 very well spent.
INSTALLATION
WHEN USING THE UNIT ON A TABLETOP FIXING THE STAND WHEN WALL MOUNTING
CAUTION
� When mounting the air purifier on a wall, the wall will become dirty as time passes. To prevent this, place a vinyl sheet, etc., around the unit. � Ensure that the wall is suitable for mounting the air purifier. � Do not install in a location with heavy smoke, such as in a kitchen, etc. The unit surface may crack as a result.
1 Remove the front panel.
� At this time, also remove the pre-filter, stamina-power carbon and the HEPA filter. Front panel 1
2
1
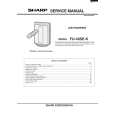
1 Determine the mounting location
Leave space around the bracket by referring to the illustration below. The unit cannot be mounted if there is insufficient spacing around the bracket.
2 Place the unit with its front
side facing down on a flat and stable surface.
� Place a soft cloth, etc., to prevent damaging the unit.
75cm or more 69cm or more from the ceiling Size of main unit 75cm or more 75cm or more
3 Insert the tabs on the stand
into the holes on the main unit and fix the stand using the supplied thumbscrews (2 units).
Tabs Holes
Mounting bracket 1 60cm or more from 60cm or more sidewall from sidewall
CAUTION
Mount on a flat surface
� Do not mount the unit to a thin wall with little strength such as a plasterboard, etc. The unit may fall and can be very dangerous.
Thumbscrews
E-6
|
|
|
> |
|