|
|
|
Who's Online
There currently are 6042 guests and
1 member online. |
|
Categories
|
|
Information
|
|
Featured Product
|
|
|
 |
|
|
There are currently no product reviews.
 ;
I downloaded the document. The manual was complete, well scanned and everything was legible. I could zoom in see what I needed to know. There's not much more that you can ask.
;
It was complete service manual with all needed service informations. Thanks.
 ;
El manual esta muy detallado, los numeros de partes y los esquemas de despiece son correctísimos y muy claros, tanto para los técnicos experimentados como para los novatos.
;
Ottima qualità grafica e completo nelle notizie. Costo abbastanza contenuto.
;
Great and quick support. The maual was exactly what I was looking for and my problem
solved. Many thanks.
FU-40SE-K
INSTALLATION
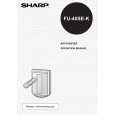
WHEN USING THE UNIT ON A TABLETOP FIXING THE STAND 1. Remove the front panel. At this time, also remove the pre-filter, staminapower carbon and the HEPA filter. WHEN WALL MOUNTING CAUTION When mounting the air purifier on a wall, the wall will become dirty as time passes. To prevent this, place a vinyl sheet, etc., around the unit. Ensure that the wall is suitable for mounting the air purifier. Do not install in a location with heavy smoke, such as in a kitchen, etc. The unit surface may crack as a result. 1. Determine the mounting location Leave space around the bracket by referring to the illustration below. The unit cannot be mounted if there is insufficient spacing around the bracket.
Front panel 2
1
1
2. Place the unit with its front side facing down on a flat and stable surface. Place a soft cloth, etc., to prevent damaging the unit.
75cm or more
69cm or more from the ceiling Size of main unit
75cm or more
75cm or more
Mounting bracket 1 60cm or more from 60cm or more sidewall from sidewall
3. Insert the tabs on the stand into the holes on the main unit and fix the stand using the supplied thumbscrews (2 units). CAUTION Mount on a flat surfaces Do not mount the unit to a thin wall wiyh little strength such as a plasterboard, etc.The unit may fall and can be very dangerous.
Tabs
Holes
Thumbscrews
2. Mount mounting bracket 2 to the main unit Mount the bracket to the back of the main unit using the included small screws (2 units).
Mounting bracket 2
Small screws (2 units)
6
|
|
|
> |
|