|
|
|
Who's Online
There currently are 5638 guests online. |
|
Categories
|
|
Information
|
|
Featured Product
|
|
|
 |
|
- Top Cabinet etc.(UP - 600)
- Top Cabinet etc.(UP - 700)
- Bottom Cabinet etc.
- Drawer Box Unit (SK 423 Type)[for KA, KB]
- Packing Material & Accessories
- Main PWB Unit
- IPL PWB Unit
- CKDC PWB Unit
- RS232C PWB Unit
- MCR Pole PWB Unit
- Pop up PWB Unit
- LCD HS Unit
- Volume PWB Unit
- Articles for Consumption
- Service Options & Service Tools
- CHAPTER 1. SPECIFICATIONS
- CHAPTER 2. OPTIONS
- CHAPTER 3. SERVICE PRECAUTION
- CHAPTER 4. SRV. RESET AND MASTER RESET
- CHAPTER 5. DIAGNOSTICS SPECIFICATIONS
- CHAPTER 6. CIRCUIT DESCRIPTION
- CHAPTER 7. CIRCUIT DIAGRAM
- CHAPTER 8. PWB LAYOUT
- PARTS GUIDE
There are currently no product reviews.
 ;
got exactly what i ordered in a very timely manner. will use again for other manuals
 ;
I'm happy. Good quality. Very helped me with my work..............................
;
This is the second Manual I have ordered from owner-manuals, I give it five stars because it is exactly what I expected given the age of the equipment. So the contents look a bit aged and the pictures a bit grainy, it fulfills my needs and I am glad I can still get hold of them.
;
thank u so much for this manual that was so cheap that i thought it was a scam but i gambled anyway because it was too good of a deal to pass up and behold,the manual has everything and details of everything even the screws and im still amazed and very happy with my manual .so take my word and jump on it before they realize how cheap they selling thier manuals..thank you so much for taking time to read my thoughts
;
I do not have very much to say.
The price is quite covenient, delivery was better as promised (about 12 ours, against the specified 24 hours if I remember well), and the quality of the PDF is more than acceptable.
The Service Manual of Sansui R30 itself is also satisfactory: good graphic for schematics and layouts, simple and well structured.
Giovanni Bianchi
6
REMOVE THE HARDWARE PARTS
3 5 1 7
[PARTS LIST]
No. PARTS NAME MICRO S/W UNIT PWB UNIT SCREW (M2 � 12) MOTOR (PR58H) SCREW (M3 � 6) SCREW (M3 � 5) HOUSING 58H
4 5 2
Q�ty 1 1 1 2 4 1 1
4 6
Fig. 16
[DISASSEMBLY METHOD] <MICRO SWITCH>
1) Remove the connector cable of the MICRO S/W UNIT the connector CON5 (2 pins) of the PWB UNIT 2) Remove the SCREW . . and the MICRO S/W UNIT from
[Cautions to be taken when reinstalling]
1. Wire the MICRO SWITCH UNIT Secure the MICRO S/W UNIT ing torque: 4.0 kgf-cm).
3
cable as shown below. with the SCREW (tighten-
Wire the MICRO SWITCH cable as shown in the figure.
<JOURNAL SIDE MOTOR>
1) Remove the connector cable of the MOTOR nector CON5 (6 pins) of the PWB UNIT . 2) Remove the two SCREWs and the MOTOR from the con.
<RECEIPT SIDE MOTOR>
1) Remove the connector cable of the MOTOR nector CON7 (6 pins) of the PWB UNIT . 2) Remove the two SCREWs and the MOTOR from the con.
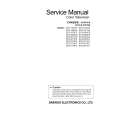
Push the cables into the grooves.
Fig. 17 2. Wire each cable as shown below.
<PWB UNIT>
1) Remove the SCREW and the PWB UNIT .
Journal motor cable Twist the cable.
Earth cable Receipt motor cable Twist the cable.
CN6
CN7 CN3 CN5
CN2
Micro switch cable
Fig. 18
|
|
|
> |
|