|
|
|
Who's Online
There currently are 6043 guests online. |
|
Categories
|
|
Information
|
|
Featured Product
|
|
|
 |
|
|
There are currently no product reviews.
 ;
Good product. All the information is invcluded, but due to the complexity of the amplifier, it still is difficult to get it to operation again.
 ;
Very professional seller; very fast, accurate and rielable service.
;
great works fine, got the manual on mail within a day
;
First class Service,
best quality, come again
Thank You.
vac
;
I didn't realise a manual for an early plasma TV such as the one we were gifted could be so easily obtained. No manual was supplied with it, and as senior citizens we were a little puzzled over some aspects of its use. I do not want a listing for your store credit as we are not fairly big computer users. The manual was well organised, as it should be, with its backing of the Pioneer name. The download was prompt and everything worked quite smoothly. Thank you. Gordon.
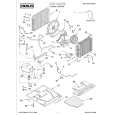
3 Rotate the mirror base B counterclockwise to remove. 4 Disconnect the connector from the copy lamp unit on the rear
frame side and from the No. 2/3 mirror unit. 5 Rotate the No. 2/3 mirror unit counterclockwise and remove.
1 Hook the metal fixture of the mirror base wire on the optical base
plate hook.
2 Pass the mirror base wire along the groove outside the double
pulley. <Note> At the time, put the No. 2/3 mirror unit on the mirror base positioning plate. Hold it so that the winding pulley groove is on the upper side, and wind the wire.
4 Pass it under the moving pulley supporting plate and wind it
around the fixed pulley.
3
5 Pass it along the groove inside the double pulley. 6 Pass in through the L pulley. 7 Hook the mirror base wire spring on the groove at the left of the
1
2
optical base plate. (Same in the front and the rear side.)
2
D. No. 2/3 mirror unit (mirror base B) assembly
Reverse the above procedures.
4 6
5
E. Mirror base wire stretching
Check that the wire groove in the front winding pulley is aligned with the wire groove in the rear winding pulley. (If there is too much a shift in the circumference, loosen two pulley fixing screws, and visually fit the positions and fix.
3 2
1
5 4 6
7
a
F. Mirror base wire fixing 1 Manually turn the mirror base drive pulley to bring the mirror base
B into contact with the mirror base positioning plate.
2 Shift the 9th winding tip of the mirror base wire from the pulley
screw hole section.
1
Mirror base B
6�9
 $4.99 SF2118 SHARP
Owner's Manual Complete owner's manual in digital format. The manual will be available for download as PDF file aft… 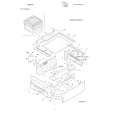 $4.99 SF-2118 SHARP
Parts Catalog Parts Catalog only. It's available in PDF format. Useful, if Your equipment is broken and You need t…
|
|
|
> |
|